Why Does a 3D Scan Need Cleaning?
Here’s the thing – a scanner captures reality, but reality isn’t perfect. Surfaces have tiny imperfections. Lighting creates shadows. The scanner might miss a spot or add detail that isn’t actually there.
A raw scan might have:
- Too many polygons – Making the file huge and slow to work with
- Rough or bumpy surfaces – Where the geometry didn’t capture smoothly
- Holes or gaps – Where the scanner couldn’t see (like underneath an object)
- Noise and artefacts – Random bits of data that shouldn’t be there
- Broken geometry – Faces pointing the wrong way or overlapping weirdly
If you tried to 3D print a raw scan without cleaning it, you’d likely get a failed print or a rough, unusable result.
Things You Need Before Wood Engraving
You need a laser cutter and engraver machine, scrap wood for trial, your primary wood for the project, and a design file compatible with design software (like Adobe Illustrator, LightBurn, or other laser engraving software). Wood selection is also crucial; common ones used for laser engravings are birch, maple, walnut, cherry, and synthetic plywood. Do some research before selecting the craft you want to engrave.
You also need to adjust your parameters on laser hardware, slower speeds give more deep engravings and vice versa. The same goes for power, i.e., higher power for deeper engravings and vice versa. Also, make sure that a soft cloth and isopropyl alcohol properly clean your wood. Also, the wood should not have any irregularities on the surface.
How do I Engrave Wood: Step by Step
- First, place your selected wood piece on the laser machine’s work area, and always make sure that the wood is securely positioned on the laser’s working bed area and is also aligned according to your design.
- Now adjust the laser’s module focus to ensure it is properly aligned with the surface of the wood. Use masking tape on the area where engraving is desired, this can significantly help to safeguard the wood from any potential damage.
- Once you are sure of the settings and placement, start the engraving process by monitoring the progress.
- After engraving, carefully remove the masking tape and use a soft brush to remove any residue or debris that may be collected. Many modern laser engravers feature air assist systems that help remove debris throughout the engraving process.
- Once the engraving is complete, remove any remaining residue and lightly sand the engraved area to smooth out any rough edges. Then apply a clear finish of polyurethane or varnish. This will enhance the life and look of the engraved design.

Our Process: From Raw Scan to Finished Model
Here’s a simplified look at how we clean up 3D scans at 3D Laser Monkey:
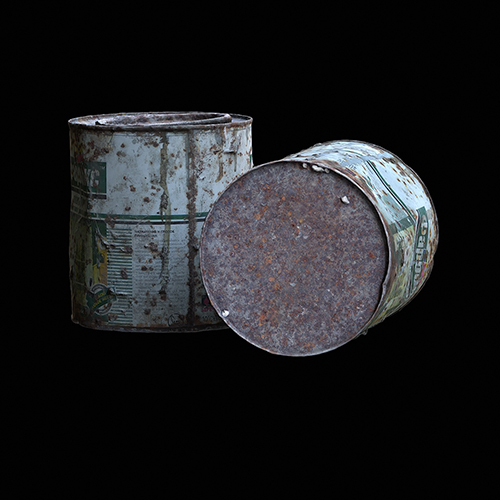
Step 1: Getting the Scan
First, we scan the object using our 3D scanner. For some projects, we use photogrammetry – taking lots of photos from every angle and using software to build a 3D model from them. Either way, we end up with a raw 3D file to work with.
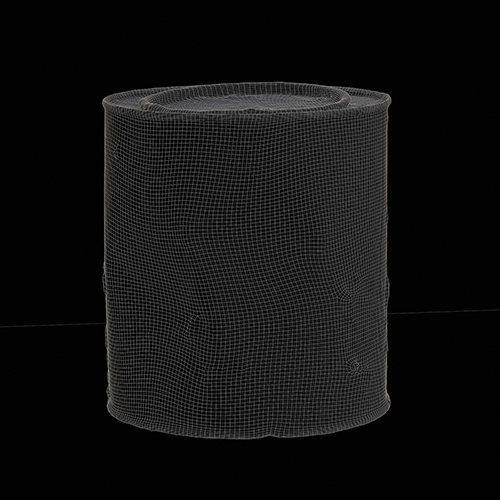
Step 2: Fixing the Geometry
This is where we roll up our sleeves. Using software like Blender or ZBrush, we:
- Remove any bits that shouldn’t be there (like the surface the object was sitting on)
- Fill in holes and gaps
- Smooth out rough or bumpy areas
- Fix any broken faces or weird geometry
Think of it like cleaning up a rough sketch before turning it into a finished drawing.
Step 3: Reducing the Polygon Count
Raw scans often have millions of polygons – way more than needed. This makes the file massive and hard to work with.
We reduce the polygon count (called “decimation” or “retopology”) while keeping the important details. The goal is a model that’s lightweight but still accurate.
For 3D printing, this step is crucial. A cleaner mesh means a better print.
Step 4: Retopology (When Needed)
For more complex projects – like if the model needs to be animated or used in a game – we rebuild the mesh entirely. This is called retopology.
Instead of the messy, automatically-generated polygons, we create a clean, organised mesh that flows properly. It’s time-consuming but necessary for certain applications.
For most of our 3D printing work, full retopology isn’t needed – but it’s good to know we can do it if required.
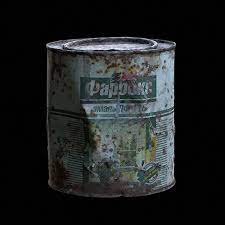
Step 5: Preparing for Print
Once the model is clean, we make sure it’s watertight (no holes), properly scaled, and oriented correctly for printing. Then it’s ready to go!
Do You Always Need to Clean a 3D Scan?
Short answer: yes, pretty much always.
Even if the scan looks okay at first glance, there are usually issues hiding underneath. Skipping the cleanup step almost always leads to problems – failed prints, rough surfaces, or models that just don’t look right.
The good news? You don’t need to worry about any of this. When you bring us something to scan, we handle the entire process – scanning, cleaning, and printing. You just get the finished product.
What Can You Use 3D Scanning For?
Here are some of the most common reasons customers come to us for 3D scanning:
Replacement parts – Got a broken part that’s no longer available? We scan it, fix the broken bits digitally, and print you a new one.
Replicating objects – Want a copy of something? We scan the original and print as many copies as you need.
Reverse engineering – Need to understand how something was made? A 3D scan gives you a detailed digital model to work from.
Archiving and preservation – Want a digital backup of something valuable or fragile? 3D scanning captures every detail.
Prototyping – Scan an existing product, modify the design digitally, and print an updated version.
Will 3D Scanning Replace Traditional 3D Modelling?
Not really – they’re different tools for different jobs.
3D scanning is brilliant for capturing real objects that already exist. But if you want to create something new – something that’s only in your head – you still need traditional 3D modelling.
Think of it this way:
- 3D scanning = copying what exists
- 3D modelling = creating something new
At 3D Laser Monkey, we do both. If you’ve got an object, we can scan it. If you’ve got an idea, we can model it. Either way, we’ll get you a file that’s ready for printing.
The Software We Use
For those who are curious, here are some of the tools we use for 3D scan cleanup:
- Blender – Free, open-source 3D software. Great for geometry fixes, retopology, and general cleanup.
- ZBrush – Industry-standard sculpting software. Perfect for smoothing surfaces and fixing organic shapes.
- Meshmixer – Handy for quick fixes, mesh repairs, and preparing files for 3D printing.
- Agisoft Metashape – For photogrammetry work (turning photos into 3D models).
You don’t need to know any of this to work with us – we handle the technical side. But if you’re into this stuff, feel free to ask us questions!