Laser engraving photos works by using a precisely controlled laser beam to remove or alter the surface of a material, creating a permanent image that can last a lifetime. The technology works across a wide range of materials including wood, glass, acrylic, metal, and more.
Before You Begin
There are a few key things to sort out before you fire up your laser engraver.
Photo Quality — Always start with a high-resolution image. A blurry or low-quality photo will produce a poor engraving no matter how well you dial in your settings.
Resolution (DPI) — Aim for 500–600 DPI. Anything below 500 tends to produce jagged pixels and uneven gradations between light and dark areas. The ideal DPI can also vary depending on the material you’re engraving on.
Material Selection — Different materials produce very different results and require different power and speed settings, so choose your material carefully before you begin.
Software — You’ll need two types of software: image editing software and laser control software.
For image editing, Adobe Photoshop is the industry standard and is what this guide is based on. Free alternatives include GIMP (very capable, highly recommended) and Inkscape for vector-based work. For laser control and sending jobs to your machine, LightBurn is the most widely used and recommended software — it’s compatible with most laser engravers, supports image import, and gives you full control over speed, power, and pass settings. Other options include LaserGRBL (free, good for beginners) and RDWorks (commonly used with Ruida controllers).

Step-by-Step Process
Step 1: Choose a Good-Quality Photo
Your photo should have a resolution of at least 300 DPI at the intended output size. It should be sharp and in focus, and ideally have a wide tonal range — meaning a good spread of light, midtone, and dark areas. High-contrast images tend to engrave beautifully.
Step 2: Edit and Crop the Photo
Open your image in Photoshop (or GIMP). Crop it to your desired size, removing anything you don’t want engraved. Adjust the tonality — brightness, contrast, and levels — to bring out as much detail as possible. A well-prepared image makes a significant difference in the final result.
Step 3: Remove the Background
If you only want to engrave the main subject, remove the background. In Photoshop, use the Polygonal Lasso Tool (L) with Feather set to 0px and Anti-alias enabled. Select and delete the background, then fill it with white and merge all layers (Ctrl+E). In GIMP, the Fuzzy Select or Scissors Select tool works similarly.
Step 4: Convert to Grayscale
Go to Image > Mode > Grayscale. Laser engravers work in black and white, so this step removes all colour information and lets you see exactly how the tonal range will translate to the engraving.
Step 5: Resize the Image
Resize your image to a resolution of 200 pixels/cm (508 pixels/inch). In Photoshop, go to Image > Image Size and enter these values. Make sure “Resample” is enabled so the pixel dimensions adjust accordingly.
Step 6: Sharpen the Image
Go to Filter > Sharpen > Unsharp Mask and apply the following settings:
- Amount: 200%
- Radius: 1 pixel
- Threshold: 0 levels
This sharpening step helps ensure fine details survive the engraving process and don’t get lost in the burn.
Step 7: Convert to Bitmap
Go to Image > Mode > Bitmap and use these settings:
- Output: 200 pixels/cm (508 pixels/inch)
- Method: Halftone Screen
- Frequency: 200 lines/cm (508 lines/inch)
- Angle: 15 degrees
- Shape: Round
This converts the image into a dot pattern that your laser engraver can interpret as varying shades of grey through different dot densities.
Step 8: Import into LightBurn
Save your file as a BMP and import it into LightBurn (or your laser software of choice). A few things to keep in mind here: wood fibres should run parallel to the long axis (X-axis) of the engraving, and your image orientation should match. Rotate 90 degrees in LightBurn if necessary. Set the image mode to “Threshold” or “Dither” depending on your preference, and position it correctly on your material.
Step 9: Set Your Engraving Parameters
Parameters vary by material — see the material guide below. Always run a test on a scrap piece before committing to your final material.

Best Materials for Photo Engraving
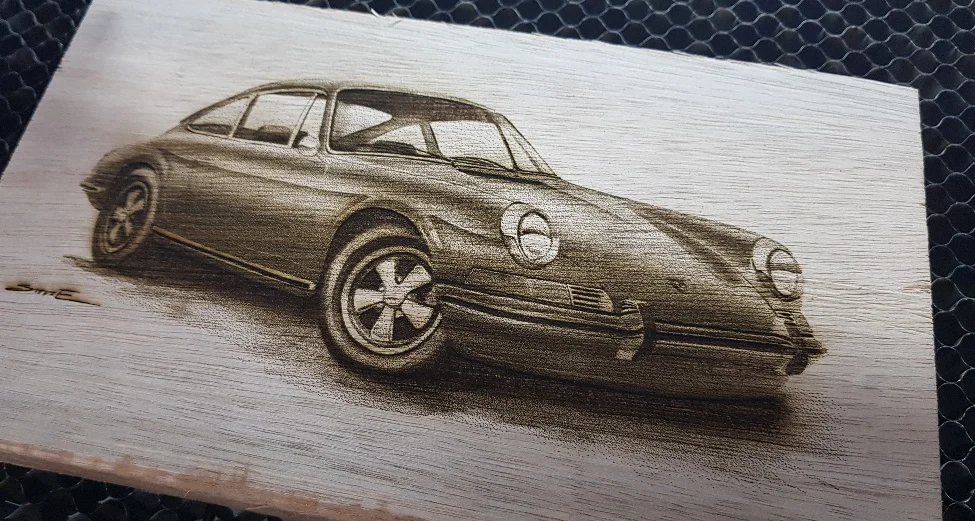
Wood is the most popular choice. It has a natural, rustic look, is widely available, and is very affordable. The main challenge is that engraving depth and contrast can vary depending on the wood’s density and grain. Softer woods like basswood and alder tend to engrave very consistently.
- Power: 20–80% (adjust based on wood density)
- Speed: 600–1000 mm/s
Acrylic produces a beautiful frosted appearance when engraved and comes in a huge range of colours. It’s durable and versatile, though it can scratch easily and isn’t ideal for outdoor use due to UV sensitivity.
- Power: 30–80%
- Speed: 100–500 mm/s
Coated or Anodized Metal delivers high-contrast, sharp engravings that are durable and suitable for outdoor and industrial use. Setup can be more complex and materials tend to be costlier.
- Power: 30–80%
- Speed: 300–1000 mm/s
Leather produces a unique branded appearance and ages beautifully over time. Engraving depth can vary based on the type and thickness of the leather, so care is needed.
- Power: 30–70%
- Speed: 300–800 mm/s
You can also engrave on glass and stone such as marble or granite — these materials require their own parameter testing but can produce stunning results.

Tips for Getting the Best Results
Start with a high-quality, high-contrast image. Enhance brightness and contrast during editing to give the laser more to work with. Always test your settings on scrap material first. Make sure your laser is properly focused — even a slight focus error will degrade quality significantly. Keep your machine well maintained, with clean lenses and a properly tensioned gantry. And don’t be discouraged if your first result isn’t perfect — laser engraving is a skill, and improvement comes quickly with practice.
Final Thoughts
With the right image, the right software, and the right settings, laser-engraved photos can be absolutely stunning — the kind of personalised keepsakes and products that clients will treasure for years. At 3DLaserMonkey, we’re passionate about helping makers, creators, and small businesses get the most out of their laser engravers. Follow the steps above, experiment freely, and you’ll be producing incredible results before you know it.